I wanted a rowing boat in the style that I remember from my childhood in England and eventually decided to build one myself. After a lot of reading and web searching I chose an Iain Oughtred design, the Acorn 15. For a description of the Acorn 15 click here.

If you would like to contact me please Click to Send me Email


Tuesday 26 July 2011

Day 25 - Outer Gunwales Fitted

The outer gunwales have been fitted and glued in place. This was a very sticky job! Lining up the gluey gunwale at the stem and clamping it in place was quite tricky while working single handed. Here are some photos of the result.

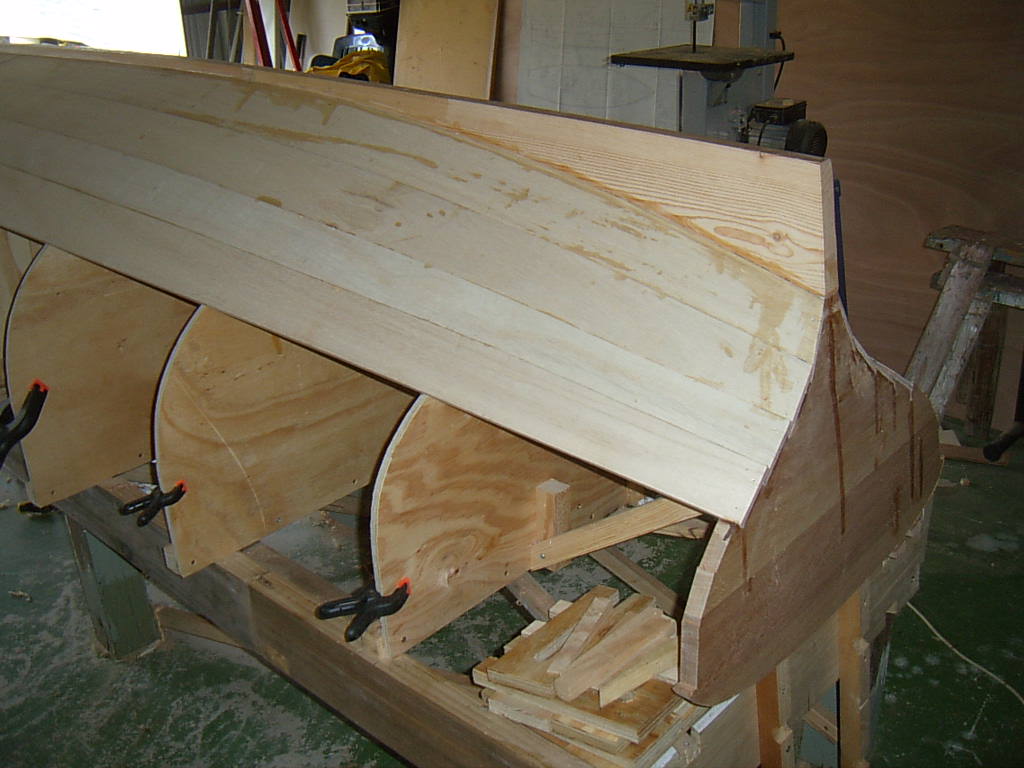
There isn't much more actual building work to do on the outside of the hull. I will add a thin hardwood strip to the keel as a sacrificial wear strip to be replaced if/when necessary and then seal the outside with epoxy prior to painting the shearstrake with varnish and primer below that. Then turn the hull over and finish the inside.


Friday 22 July 2011

Days 23 and 24 - Patches, Outer Stem and Rubbing Strakes

Day 23 spent on various jobs with no photos taken. The strips were fitted at the stem to correct the error mentioned in the last post. The outer stem was shaped to be a good fit against the inner stem and its sides were bevelled. I rough sawed and planed the timber for the gunwales - 5 metre lengths of timber are not easy to handle!

On day 24 the outer stem and rubbing strakes were glued in place. This photo show the outer stem in position. The green strip is a ratchet tie down used to hold the stem in position while the epoxy goes off. The photo also shows the strip, on top of the third plank down, patching up the error with the planking. I think the result will be OK but would rather have got it right first time.


The rubbing strakes are in place held by temporary screws until the glue sets. The screws will be removed and the holes plugged.


Thursday 21 July 2011

Day 22 - Fitted the Shearstrake

Well that's the last plank fitted and photgraphed. That's a major milestone for me. Still quite a lot to do before it can be turned over; I have to fit the outer stem, outer gunwales, rubbing strakes on the bilges, clean it all up and start the painting.


This photo shows the mistake I made with the third plank down from the keel. When making the pattern I picked up the wrong mark on the stem with the result that the third plank is too narrow and, to correct the situation the fourth plank is too wide. The only solution  that I can come up with is to add a strip to the upper edge of the second plank to make it wider. This will hopefully hide the uneven plank widths.


Wednesday 20 July 2011

Days 20 and 21 - Even More Planks

Two days fitting the fifth and sixth planks. There is only one more to go but that's tomorrow's job. Here is a photo after the fifth plank.


And another showing the pattern being taken for the sixth plank.


The pattern material is 3mm MDF which is good because it is cheap. However, it is not very rigid and can easily be deformed which would result in an inaccurate pattern. This can be worked around by taking more care but next time I will use thicker MDF or maybe try a cheap plywood. This is also the last of the MDF so I will have to take mark out the shearstrake (seventh plank) directly without using a pattern.

Here is the boat with the sixth plank fitted.


Sunday 17 July 2011

Days 17, 18 and 19 - More Planks

Days 17 and 18 spent fitting the third and fourth planks. It takes me most of a day to go through the process of fitting a pair of planks. This involves fairing the stem and transom, bevelling the edge of the previous planks, cutting the gains at the stem, making a pattern for the new planks, cutting the new planks and finally gluing and clamping them in place. It all adds up to a long days work!


On day 19 I scarph jointed the second two sheets of ply. Take two 8 x 4 sheets, rip them lengthways into four 8 x 2 sheets, scarph join these in pairs to make two 16 x 2 sheets and then go do something else until the glue dries. 


Thursday 14 July 2011

Day 16 - Keel, Skeg and Second Plank

Spent a sticky few hours today gluing the keel, skeg and second plank on both sides. The building notes leave fitting the keel and skeg until all the planks are in place but I decided to do it now to avoid having to reach over half the boat to do it. So, the keel and skeg are glued and screwed in place. Both second planks are also glued and clamped in place. The photos below show the result of the days work.


Wednesday 13 July 2011

Day 15 - Preparation for Second Plank

This was a long day! I hoped to have glued the second plank down but I ran out of time and energy! What I did was:
  • Bevel the edge of the garboard plank so that the second plank will fit nicely against it.
  • Cut the gain in the garboard plank towards the stem. The gain is difficult to describe so a picture is included below. The purpose of the gain is to avoid a double thickness of planking at the stem.
  • Shape the stem so that the rest of the planks will fit properly against it.
  • Shape the transom for the second plank. This can only be done after the previous plank is fitted.
  • Make a pattern for the second plank from 3mm think MDF sheet. This is tricky towards the stern where the concave shape doesn't allow the pattern material to lie close against the garboard plank. Several trial fittings were needed getting closer to the final shape each time. This was quite time consuming.
  • The pattern was used to mark out and cut two planks together. These planks were tried and adjusted several times before they fitted nicely against the garboard plank, the gain at the stem and the transom.
Here is a photo of the gain in the garboard plank at the stem. The tape on the mould is simply to stop the planks being glued to it accidentally.


The photo below show the second plank laying against the transom. The bevel on the garboard plank moves onto the second plank towards the stern. This bevel can been seen in the photo.

Sunday 3 July 2011

Day 14 - Garboard Planks Glued in Position

I spent an hour laying out all the clamps, putting tape over the moulds so the boat won't stick to them, finding long screws for the block clamps at the bow and stern and then took several deep breaths and mixed up the first batch epoxy.  It is surprising how long it takes to spread epoxy on two mating surfaces about 25 mm wide and 4.5 metres long! The first plank was clamped in position at a few places before the second plank was coated with epoxy and put in position. With the two planks positioned I put the rest of the clamps in place working from the middle towards the bow and stern. The block clamps were screwed to the keelson and stem using screws that would not break through to the inside of the boat. The plank was nailed (temporarily) to the transom with a couple of nails each side; the padding under the nail can bee seen in the photo. Here is the end result:


I thought I had made too many of those wooden clamps but they were all used. I made another 20 or so because the rest of the planks have to be glued edge to edge and get longer as the gunwale is approached. Can't have too many clamps! I think the rest of the planks will be easier than these two because they can be done one at a time.